Showing posts with label Soul Kitchen. Show all posts

Thursday, 25 February 2016

Book Review: 30 Days of Daal by Pragati Bidkar

30 Days of Daal by Pragati Bidkar
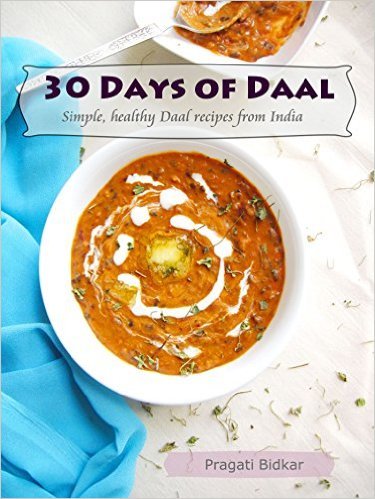

 
Pragati Bidkar's 30 Days of Daal
Title: 30 Days of Daal
Author: Pragati Bidkar
Paperback: 153 pages
Publisher: Amazon Digital South Asia Services, Inc. (2 edition, 25 November 2015)
Genre: Cookbooks
Read: eBook
Stars: ★★★★☆
Buy On: Amazon India | Amazon US


Summary:


(Goodreads)

30 Days of Daal shatters the myth that cooking Indian food is complicated. The author has taken authentic daal recipes from the corners and heartland of India and made them simpler.

Whether you are a busy urban cook, or someone who is new to cooking Indian food, 30 Days of Daal will make it easy for you. The book contains attractive photos of the daal dishes and has precise step by step instructions with special notes when needed. There is also a section on how to stock an Indian pantry.

Daal is an essential component of an Indian meal, and is cherished as a source of vegetarian protein. Daal is the very soul of India. 30 Days of Daal allows you to cook and enjoy a different daal every day of the month so you never get bored.


My Review:


Note: Thanks Pragati Bidkar for offering me this book to read, use and review :)

Cover: Colourful

Paper and font: Easy on the eyes

Readability, language: Could be better

Why did I choose this book: Daal is my soul food, I could eat it everyday and not get bored of it. It’s what I make when I’m down in the dumps and even when I’m happiest. So, 30 Days of Daal is perfect for my first cookbook review. :)

30 Days of Daal is what the title says, 30 different types of daal from across India, in all it’s various styles and varieties. It covers daals from the simple Yellow Moong Daal to the Parsi Dhansak and Oriya Dalma.

This is a review of the first edition of 30 Days of Daal, however there is a new edition available now and things might be a bit different in it.

This book starts of with an introduction to what is Daal and explains why this simple lentil curry is so important to the Indian cuisine. This is followed by 30 recipes of a variety of daals and at the end there are details of all the lentils, rice, spices, oil, and cookware used and where you can get them. This section is specially helpful for Non-Indians or Indians who live in the US.

Daal Methya from Pragati Bidkar’s 30 Days of Daal. Daal Methya or Fenugreek Flavoured Daal with Chili Oil and ivy gourd palya as the vegetable dish


I tried out the book on my Kindle and on three ebook apps on my Android Nexus 6. I had hoped that it would be easier to use on the phone, as it would be handy in the kitchen and would be in colour, but I was disappointed by the books rendering on the phone. On all three apps the layout was bad and navigation difficult. Even on the Kindle the layout is a little off, but it worked well and was easy to use. Sadly, that meant I had to live with no colours.

Each recipe has an image of what the daal looks like, the set of ingredients needed and the method of preparation. The instructions are simple to follow and Pragati Bidkar has also added notes to make it easier for the first timer. For e.g. she reminds you that chillies splutter and that you must stand back to avoid getting splattered by oil.

One thing that was glaringly missing for me was the serving size. It meant that in some recipes I landed up making too large a quantity for the two of us and we had to eat the same daal for 4 meals to finish it. I’m not complaining too much about it, only because the daals turned out well. ;)

Smoky Black Masoor Daal with CoconutSmoky Black Masoor Daal with Coconut and banana poriyal as the vegetable dish


For some ingredients that are difficult to source outside India, special notes are added about substitutes. This helped me too (even though I live in India), as some of the ingredients aren’t easily available here too. Like Goda Masala, which is Maharashtrian and isn’t available at most stores.

I tried out the Daal Tadka, Daal Methya, Black Masoor Daal with Coconut and Tomato Daal and they all turned out well. As you can see for trying out, I choose the simplest recipes I could find but I flexed a bit and experimented a bit too with a couple. I’m looking forward to trying out the slightly complicated (to me) ones like - Daal Bukhara, Parsi Dhansak and Panchmel Daal from Rajasthan.

Over all this is a good book to have in the kitchen, as it can add much variety to a simple everyday dish like daal. I recommend it for all who love the Indian cuisine, especially if you like cooking it. ;)

Buy On: Amazon India | Amazon US

About the Author:


 
Pragati Bidkar Pragati is the founder and creator of the vegetarian food blog KamalKitchen.com. She started experimenting in the kitchen at a young age and since then has traveled to many places and absorbed regional cuisines and influences. She focuses on using local produce and selective herbs and spices. Her next book 'Rice Bowl: Vegetarian Rice Recipes from India and the World' will hit the stands on March 1st, 2016.

Author Links:
Website │ Goodreads │ Twitter │ Facebook


Friday, 27 March 2015

Cooking With Doodhi


***Note: Doodhi is one of my favourite vegetables. I enjoy eating it no matter the dish but I do have my favourite dishes. I'd put together this collection ages ago but even today these are my favourite doodhi recipes.***

The bottle gourd also known as the calabash gourd or the white flower gourd is popularly known as doodhi in India. It is a native of South America but is grown extensively in India. Archeological evidences support man's association with Bottle Gourd in Peru from 11,000 to 13,000 years B.C.

The gourd is usually bottle shaped but can also sometimes be trumpet shaped. It is a vegetable with a good source of carbohydrates, vitamin A, vitamin C, and minerals. Bottle Gourd may be fried, boiled, or stuffed with the tender fruits used for making sweet meats. The hard shell of mature fruits may be used to make water jugs, domestic utensils, musical instruments and floats for fishing nets. In addition tender stems and leaves posses some medicinal value.

There are alot of sweets and dishes that are made from this vegetable but I have tried to put together a few easy to make and tasty recipes. These are nutritious and also very good for the weight conscious.


Doodhi Halwa


Ingredients
1kg bottle gourd
3 cups of sugar
1 cup of milk
3 tablespoons of ghee
4 cardamoms

Method
1) wash, peel and grate gourd
2) Steam in pressure cooker for 15min.
3) Remove when cool, add sugar and milk and let it simmer on a low fire. Stir continuously. When it is well cooked, add ghee and powered cardamom. Stir well and remove from fire.


Kadu Puri


Ingredients
White gourd ½ of small gourd
Salt
Rice flour 400gms
Chilies
Oil

Method
1) grate gourd
2) grind chilies
3) Add salt, flour and chilies to gourd and mix nicely. Should be sticky but not watery. Do not add water.
4) Now make capatis on a plastic like we make for vadas.
5) Deep fry till golden brown.


Doodhi Milk Shake


Ingredients
Bottle Gourd
Milk
Elaichi

Method
1) Grate the doodhi and steam for 15 min.
2) blend in mixie
3) now add desired amount of milk and elaichi(cardamoms)
4) Serve cold.

The doodhi halwa and puri is not exactly for the weight conscious but the milk shake sure is. If a little milk cream is added to the halwa while still ho, it enhances the taste of the halwa. Serve the halwa cold it tastes better. Same goes for the shake, serve it cold. The puri’s are best eaten hot, and will taste better with mint or chilly chutney.
Doodhi is supposed to be good for the eyes, hair and skin. I glass of doodhi milk shake every day morning or evening is very good, it is also cooling for the stomach so real good for people who have stomach burn.

Tuesday, 24 March 2015

An Assortment of Toast Toppings


Toast doesn't have to be boring or simple. It can be made with various toppings that will add to the dish and leave it no longer being the simple toast but rather an extravagant affair. Or at least not boring. ;)

We are so used to eating toasts for breakfast. It’s the easiest and fastest to make but with small little add-ins it can be made into something special and real yummy.

Here are some toppings that go very well with toasts.

- Grate cheese, carrot. Mix the cheese, carrot and a little chopped coriander with mayonnaise. Spread on the toast while still hot and serve.

- On a hot toast spread creamed cheese and chopped boiled ham or bacon, with a touch of chutney. You could also use roasted meat.

- Top toast with chopped hard boiled eggs, crisp chopped bacon or roasted meat and a little mayonnaise to bind.

- Add chopped hard boiled eggs, a pinch of chilli powder and a little chutney to the toast.

- Peel and core apples. Fry thick rings of apples in ghee. When apples are soft, add the slices of cheese and leave until the cheese begins to melt. Place this on the toast.

- Slice tomatoes and fry in butter or margarine. Season, along with a pinch of sugar. Garnish with chopped coriander and serve on top of toast.

- Top the toast with boiled rajma mixed in tomato sauce. Add rings of onion and chopped coriander on top.

- Spread grated cheese on toast and sprinkle a little of finely chopped chilies. Put the toast in the grill and heat till the cheese just melts. Serve hot.

- Spread butter on the bread. Put a slice of ham or meat on it. Top with cheese slice and a ring of tomato. Place in grill and toast till cheese just melts.

What do you do with your toast? Do you put just butter or a other stuff too?

Friday, 6 March 2015

Friday Review: Afghani Qabuli & Biryani


I consider myself a foodie even though I am quite a fussy eater. Well, you know like haggis, there’s going to be a lot of fuss before I eat that. :D

But seriously, I do love trying out new food and exploring flavours so when I am offered an option to go to a new restaurant, I’m not one to say no.

We’d heard of Afghani Qabuli & Biryani from friends who recommended it highly and so one afternoon we headed out to check it out.

Situated on Nehru Main Road in Kammanahalli, this little Afghan place is hidden away and yet easy to find. The layout on the inside is simple with a comfortable seating arrangement that can accommodate a couple or even a large group. The walls are covered with paintings and pictures of Afghanistan.


We settled in and ordered what we had been told was the best dish in the house. The Afghani Traditional Mutton Gravy with Qubus and Chakni. It comes with a mug of Afghani Traditional Dogh so we asked for that to be made two.

The mutton gravy was served in a large dish what facilitated the tradition form of community eating. We broke bread and dug in, breaking off only to sip on our dogh’s. The gravy was lovely and yum with about 7-8 pieces of boneless meat. The dogh is something else, refreshing and quite close in taste to our raitha and yet so very different.


Service is fast with minimal waiting time. Service is also done with courtesy and a smile. We enjoyed lunch but that wasn’t all we ate. We were also served a complimentary plate of firni, boy you should have see the smiles on Che and my face. :D


We enjoyed our experience so much, we’ve been there again, and this time along with the mutton gravy we also tried the Afghani Traditional Biryani. This was also great in taste but maybe not my favourite since I don’t like sweetish food too much.

Over all this is a must visit place if you like Arabian/Afghani food. A nice ambience, well lit, simple and clean. Not noisy music, delectable food, impressive service and light on the pocket pricing (Our bill was about Rs.500 for 2 people). This place has it all!

My Rating -
Ambiance - ✷ ✷ ✷ ✷ ✷
Music -        ✷ ✷ ✷ ✷
Food -          ✷ ✷ ✷ ✷ ✷
Service -     ✷ ✷ ✷ ✷ ✷
Price -         ✷ ✷ ✷ ✷ ✷


Afghani Qabuli & Biryani - Zomato

Phone - +91 9008735522

Location - Shop 21, Nehru Main Road, Kammanahalli, Bangalore 560084

Friday, 3 October 2014

Friday Review: I & Monkey - The Resto-Lounge


***Disclaimer - I & Monkey is owned by a friend but the following review has no bias because of it. What I say is what I got and what I felt. ;)

Che and I have not done a lunch together is a long time now. Let me explain that. Considering that I don't like cooking so much and Che is too busy to cook usually, we eat out a fair bit, however our eating out is more about getting the meal done (and at a cheap price) rather than eating a meal.

So, last Saturday when we headed out and contemplated a meal we would sit down and enjoy, I was all excited. A sit down meal together outside is like a date, filled with good food and quality time together. A time to unwind and rewind.

Cruising around Indiranagar we were trying to make up our minds on where to eat, when I saw I & Monkey and the decision was made. I've known Sathish who owns the place for years now and have lost count of the number of times I've have been to his first place Windsor Pub. But somehow even though I & Monkey has now been around for over a year I hadn't made it here yet. It was time to correct the grave wrong and check out Sathish's now not so new place. ;)

I walked in tentatively, not knowing what to expect and looking around to absorb it all. There were three seating areas to choose from, a tent type roofed room with warm light, a room with pub-ish decor and a bar and this little small space that was well lit with a dash of green. The host stepped up asking us where we would like to sit and I just looked at him unsure of my choice. He smiled and led us to the little white and green space that seemed perfect, I thought as I sat down, for a couple to have some together time.


It didn't take us long to make up our minds about the thirst quenching drink. :D Please note we were spoiled for choice in the liquor menu but the cocktail section beckoned and before long Che and I had settled down with a Mohito and a Black Magic. I'd never had a Black Magic before but the description listed about 5 types of alcohol and blackcurrant juice as ingredients, and I was feeling adventurous. :D


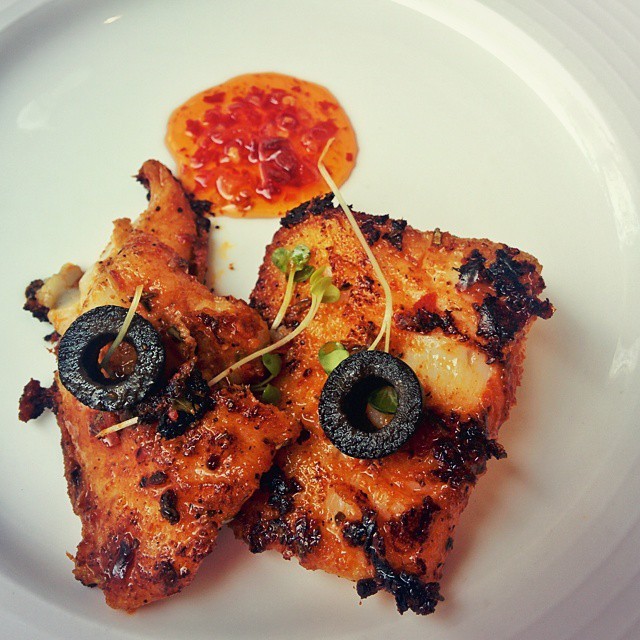
To go along with the drinks we choose Chilli Sambal Fish as a starter (after much discussion over the variety on offer). I'm not much of a fishy person but lately I've been experimenting and enjoying myself with fish. This one didn't disappoint either, and it was so good Che and I almost came to blows over the last piece and were saved just in time by the flambe cart arriving.

http://instagram.com/p/tcSKfhyxrm/

Yep, you guessed right, I was going to have a flambe. :P While Che ordered a T-bone steak, I chose Flambeed Beef Medallions as the main course. Watching the flambe was fun, as you can see in the video. :D But eating the resultant dish was way more fun. I enjoyed it immensely and polished off every bit.


To round off and complete the meal we decided to culminate it with dessert and coffee. Che had Tiramisu and an Americano while I had an Absolute Nirvana with a Cappuccino. Gawd that dessert really was Absolute Nirvana. I oohhed and aahhed my way through it, too full to eat it all and yet unable to stop until I had finished it all.


It was a lot, and I mean a lot coz Che and I sat there for a while before we managed to get up and move again. :P It was a meal I enjoyed in all the aspects, ambiance, service, flavour,... The food was so good we couldn't rush through it and that meant some amazing time and conversation together. The bill was about 3,500 bucks but it was worth every penny.

I'm looking forward to another trip to I & Monkey, after all there is so much to sample yet on that menu. ;) If you are looking for a place to unwind, catch up and eat some awesome food, I & Monkey is the place to go to, especially for lunch. :)

My Rating -
Ambiance - ✷ ✷ ✷ ✷ ✷
Music -        ✷ ✷ ✷ ✷
Food -          ✷ ✷ ✷ ✷ ✷
Service -     ✷ ✷ ✷ ✷ ✷
Price -         ✷ ✷ ✷ ✷


I & Monkey - Website & Facebook

Phone - +91 80 40923656 / +91-80-40923657

Location - Indira Nagar, 12th Main

Monday, 19 August 2013

Baking For my Dogs - How to Make Carrot, Oats and Coconut Dog Biscuits


Over the last year I've been experimenting with baking and trying my hand out at the oven. Some recipes that turned out well I've shared like pizzas, sponge cake, ... but some I'm still figuring out. Need to get that Rum Rich Plum Cake recipe down to pat.

Anyway, a downside to all that wonderfully smelling baking was the dogs giving me doleful looks and I feeling all guilty for withholding that piece of cake. So I figured I'd make them something that they can eat. Yep, I thought it was that simple.

Online research found me some quick and easy recipes but it also brought up questions like - is flour(maida) good for dogs?, what could I substitute for flour?, how could I make healthy treats?,... This took me more time to figure out. After a fair bit of reading and talking to various people, here's what I found out.

Plain Flour(maida) is bad for dogs and best not given. It can be substituted with whole wheat flour, however some dogs are allergic to gluten (and it seems the number are rising) so you need to try it out and see how your dogs fair.

Another option is coconut flour. Until recently I had heard only good things about coconut products for dogs (google coconut flour for dogs), however recently I heard of one Vet who said it's not good for dogs. My vet though says it's good. So well, you figure.

From what I read though coconut products seem to be working wonders in most dogs. My Cuckoo loves coconut, (you should see her excitement when she hears us breaking them) and she's not had an issue with it yet. Of course I give it moderate amounts. That said, getting coconut flour wasn't easy and I'd been hunting for it until Vidya tipped me off about Heather's Coconut Flour recipe. That one was easy to make at home but I didn't get much flour out of it.

The last option as of now that I've found is oats. Oats come in various forms like rolled oats, quick oats and instant oats. According to the book 'On Food and Cooking: The Science and Lore of the Kitchen' by Harold McGee the main difference between the types of oats is their texture, thickness and cooking times. They can usually be substituted for each other as all oats have the same nutritional value.

Each type of flour also has it's own unique properties, oat flour contains an essential fatty acid GLA (gamma linolenic acid) that's important in the body's production of favourable eicosanoids (PGE1 - prostaglandins). Oats is also proven to lower cholesterol and reduce the risk for heart disease. Coconut flour on the other hand is a good source of protein, iron, fiber and it is 'low-carb'. Coconut also contains the fatty acid Lauric acid, which boosts the response of the immune system in the body.

Something to keep in mind for all substitutions is that each flour has different properties and so the quantities you need will vary and cooking times will change. You'll have to try and test your way to the right proportions. Also some flours don't work all by themselves, like oats used alone will not hold together and rise well so it's best to use it in combination with other flours.

If you'd like to read more about flours and dogs, Susan Leisure's article 'What Type of Flour Is Good for Dogs?' is a good start point.

After all that research and figuring out, I went hunting for recipes that had coconut flour and oats. I decided to start out with The Fonte's Paleo Dog Biscuits Recipe with Carrots & Coconut,  but I found a few others too that I liked and pinned for later.

I made some changes to the original and added oats, here's my take on it.

How to Make Carrot, Oats and Coconut Dog Biscuits

Ingredients -
(makes around 200 gms)

225 grams crudely chopped carrots
1/4 cup coconut flour
1/4 cup coarsely ground oats
1/4 cup fresh coconut
2 eggs
Coconut oil

Method -

1. Preheat oven to 175 C.

2. Grind the coconut and carrot to a smooth paste.

3. In a bowl mix the paste, oats and coconut flour well.

4. Add eggs to the flour mixture and mix thoroughly.

5. Pour the mix into a piping bag. (I improvised with a washed milk packet)

6. Prepare a tray with greased butter paper. (Best to use coconut oil for this if you have it, else use sesame or olive oil)

7. Pipe little blobs onto the tray keeping enough distance between the biscuits. The size of the biscuit is up to you. I wanted them small as that way I can use more of them while training without giving the dogs too much of it.

8. Bake for about 12-15 minutes or until the tops get golden brown.

9. Remove and allow it to cool on a wire rack.

10. Remove the lil cookies from the paper and store in an air tight jar.

Note: I did try to make them crunchy by drying them out as much as possible but they just got soft again. I think it might have to do with the egg but I'm not sure. Do you know?

My dogs loved the cookies and they are working like a charm while training. They're depleting fast too, which might not be a bad thing considering that I don't know how long biscuits with eggs last outside of a fridge.

Update: The biscuits/cookies lasted about a week in an air-tight jar before I started to see fungal growth. Storing them in the fridge is one thing I can do to make them last longer. Anything else you'd suggest?

Have you baked for your dogs? What's your take on coconut flour and oats? Any favourite recipes I should try?

Sunday, 18 August 2013

How to Make Benne Biscuit or Butter Biscuit


A couple of weeks back I got the recipe to make Benne Biscuit or Butter Biscuit from a friend but something kept coming up and I just couldn't get any baking done. Couple of days back though I got my fix with a full day of baking. I baked over 100 biscuits (Mom was having a family lunch and wanted some for tea) and even managed to bake some cookies for the dogs. :D

The biscuits turned out beautifully and everyone loved them. (Thanks @Kavitz for the recipe.) The recipe's easy to follow and the biscuit dough is quick to make, of course baking takes ages but when something good is baking, it always feels like that, doesn't it :P The biscuits also have besan and sooji in them and that makes for less maida which I really like, as it makes the biscuits more healthy.

Alright, a quick note before I get to the recipe. Below is Kavitha's recipe but I've played and tweaked with the method a bit so, if you get good results it's Kavitz's doing and if not, it's mine :) Well, not really, maybe bad biscuits just means you need to try again :P

Benne or Butter Biscuit

Ingredients -
(Makes around 20-24 biscuits)

1/2 cup or 115 gms butter
1/2 to 2/3 cup sugar (based on your sweet tooth)
1/3 cup maida (all-purpose flour)
1/3 cup fine rava (sooji, semolina)
1/2 cup besan (chickpea flour)
1/4 tsp baking powder
Optional: Add 1/2 tsp cardamom powder
Dry fruits like almonds, cashew, pista, walnut, raisins, etc.

Method:

1. Lightly roast the rava on a small/medium flame until it changes colour to off-white.

2. Crush or grind the sugar to get a mix of powder and crushed crystals. A baker once told me the secret to sugar in baking was adding it as crystals to butter and letting them melt while baking to add air to the biscuit or cake. However the regular sugar I get from the shop has big crystals that do not breakdown in the butter creaming process or fully melt in the baking so I crush them. If you're using 'Parry's' sugar crushing may not be required as the crystals are already small.

3. Pre-heat the oven to 180C.

4. Cream the butter a bit in a bowl before adding the crushed sugar. Continue creaming until the butter lightens to lemon yellow and gives off this lovely buttery smell. :) For biscuits I usually cream by hand and that means a good 20 minutes of creaming so I take breaks and do it in four parts or more. :P

5. In another bowl add the maida, besan, rava and baking powder (and cardamom if you wish). Mix them well to get a uniform mixture.

6. Add the flour mix to the creamed butter and knead to make a soft dough.

7. Prepare a baking tray lined with greased baking paper.

8. Make little patties out of the dough. I used a 1/2 tsp measure to get similar sized biscuits. Roll and slightly flatten the balls before placing them on the tray.

9. I didn't land up using dry fruits but at this point you can add shredded dry fruits to the top of the patties. Push them half into the biscuit to make sure they don't burn at the top.

10. Bake the biscuits for about 13-15 minutes. If you like your biscuits being a bit moist in the center, remove them from the oven when golden. If you like them dry and crisp leave them in a minute extra so they get a touch of brown before you remove them.

11. Allow them to cool on a wire rack and then eat to your hearts content :)

I'm always on the look out for healthy biscuits; that way I don't have to worry too much about Che's middle of the night binges. Have you made any healthy biscuits lately? Any biscuits that I must try baking? Any suggestions at all? :)

Tuesday, 16 April 2013

Review: Vishu Sadhya at the Sanjeevanam Restaurant


I've not been to a lot of sadhya's and until recently I didn't even know what a sadhya meant but I do appreciate good food. So on Saturday when Che suggested we go out to lunch for a Vishu Sadhya there was no way I'd say no. A meal with 27 varieties of dishes is a treat for the tongue, especially when it's an all-vegetarian fare!

The Sanjeevanam Restaurant in Koramangala (owned by the same guys who make the Medimix soap) was offering a special Vishu Sadya on 13th and 14th April, and we figured we'd beat the crowd and go on 13th. We'd never been to this restaurant before and this seemed like a good opportunity.

So what's Vishu?
Vishu is a Hindu festival celebrated in Kerala usually in the second week of April. The occasion signifies the sun's transit into the Meda Raasi (first zodiac sign) according to Indian astrological calculations, and represents the vernal equinox. "Vishu" in Sanskrit means "equal". It is the start of the new year.
"Vishu" is celebrated with much fanfare and vigour. People wear new clothes, elders give money to youngsters and childern set off firecrackers as part of the celebration.It is also a day of feasting and the foods consist of equal proportions of salty, sweet, sour and bitter items.

And what does Sadhya mean?
Sadhya means banquet in Malayalam and is typically a feast of the people of Kerala. It is traditionally a vegetarian meal served on a banana leaf and can have about 24-28 dishes served as a single course.
The main dish is plain boiled rice, served along with other dishes collectively called Kootan which include curries like Parippu, Sambar, Rasam, Pulisseri and others like Kaalan, Avial, Thoran, Olan, Pachadi, Mango pickle, Naranga curry, as well as Papadum, Banana, plain Yogurt or Buttermilk, and plantain chips. The traditional dessert called Payasam served at the end of the meal is of many kinds and usually three or more are served. The meal may be followed by vettila murukkan, chewing of betel leaf with lime and arecanut. This helps digestion of the meal and also cleanses the palate.
The dishes are served on specific places on the banana leaf in specific order. For example, the pickles are served on the top left corner and the banana on the bottom left corner, which helps the waiters to easily identify and decide on offering additional servings. Some say the reason for including so many dishes in the Sadhya is to ensure that the diners will like at least two or three dishes.

The 27 Dishes Served
Below is the list of the different dishes on my leaf (/the ones I ate). I've tried to remember the order of serving and have even tried to find the traditional names. Please let me know if I've got it wrong, so I can correct it :)


1. Salt
2. Banana Chips (salty)
3. Banana Chunks (sweet)
4. Achaar - Mango Pickle
5. Achaar - Ginger Pickle
6. Achaar - Lime Pickle
7. Olan - Sliced pumpkin in coconut milk
8. Kaalan - Yam cooked with yogurt and coconut
9. Bittergourd Thoran - Sliced bittergourd cooked in a sauce
10. Aviyal - Mixed vegtables cooked in a coconut sauce
11. Vegetable Thoran - Sauted beans and carrots with grated coconut
12. Vegetable Thoran - Sauted cabbage with grated coconut
13. Pachadi - Pineapple and pumpkin
14. Kichadi - Yogurt and cucumber
15. Koottukari - banana or jackfruit in a coconut sauce
16. Pappadam
17. Boiled Rice
18. Parippu - A simple dal
19. More Kuzhambu - a curry made from yogurt
20. Buttermilk
21. Ada Pradhaman - Milk-cream payasam
22. Palada Pradhaman - Milk and rice payasam
23. Banana - as a finishing fruit
24. Vettila Murukkan - betel leaf/paan

There was also Sambhar, Rasam and Yogurt to be had with rice, but it was all too much and I had to skip these.

My Thoughts
I enjoyed the food. I am a non-vegetarian but being South Indian at heart I love good vegetarian food and this was a large spread of the good stuff. Tasty and cooked well the food was stored and served in simple clean home-style manner and the servers were attentive hosts always somewhere in the background ready to replenish the food on my leaf before I could ask. I had to stop them after a while, saying no-more with a sigh.

I'm looking forward to more sadhyas at the Sanjeevanam Restaurant. I hope that next time along with lunch they'll offer a bed too; I'd like to complete the meal with a siesta!

Information Credit: Wikipedia

Tuesday, 26 March 2013

How to Make Lemon (Lime Juice) Rice and Coconut Chutney


*** I am following Meenakshi Ammal's recipes, however I'm using shortcuts like the cooker, etc. and adding some of my own twist to the recipes. What you see here are my recipes inspired by M. Ammal's and in no way is Ms. Ammal responsible for its outcome should you choose to try it. Though she was responsible for the brilliant outcome of my dish, so, a big thank you Ms. Ammal for writing Samaithu Par.***

It's been a while now since I cooked from the Samaithu Par. The last couple of weeks I've been cooking a lot of Mom's recipes which being curries aren't as simple as South Indian cooking so I'm still working on mastering the proportions. I'll share the recipes here as soon as I have that down to pat.

Anyway as I was saying I haven't tried something from the Samaithu Par in a while so I thought I better get back to it else I'll never finish all the recipes. I had planned to make another dish along with the lemon rice but we impulsively decided to go watch Life of Pi in IMAX 3D, and so I stuck to a simple chutney with the rice. The chutney and rice made for a good combo and we didn't really miss the dish I didn't make. :D 

Both the the lemon rice and chutney were very easy to make and didn't take much time either after the rice had been made. Here's the recipe I followed and note it's a bit different from the book.

Lemon Rice

Ingredients -
(Serves 2)
1 cup rice
2tbsp of lime juice
1 tbsp bengal gram dal
1 tsp mustard seeds
2 tsp roasted chick peas
4 red chillies split into two
4 green chillies
1/4 tsp asafoetida
A few curry leaves
 A handful of finely chopped coriander
1/4 tsp turmeric
2 tbsp ghee
2 tbsp gingelly oil
Salt to taste

Method -
1. Wash and cook the rice with 1 and 3/4 cup water and a little salt.

2. Cool the rice, add 1 tbsp of ghee and separate the grains so there are no lumps. 

3. In a cup mix the lime juice, a little salt and turmeric.

4. Heat the oil and 1 tbsp of ghee in a wok.

5. To hot oil add the mustard, chick peas, bengal gram, red chillies, green chillies, curry leaves, and asafoetida. 

6. When the mustard starts to splutter and the bengal gram and chick peas are golden brown start adding rice.

7. Add the rice a little at a time while mixing continously so that the rice and seasoning is mixed homogeneously. 

8. Add half the lime juice to this homogeneous mixture and mix well before adding the second part.

9. Check for salt and add more if required.

10. Sprinkle the finely chopped coriander and serve. 

Green Coconut Chutney

Ingredients -
150gms coconut
Fist full of coriander
2 green chillies
1/2 tsp black salt
Salt to taste
3 dry red chillies split into two
1 tsp mustard seeds
1 tsp bengal gram dal
A few curry leaves
1/4 tsp asafoetida
2 tsp oil

Method -
1. Grind the coconut, green chillies, coriander and black salt into a fine paste with just as much water as required. Add salt to taste.

2. Heat the oil and add the red chillies, mustard, bengal gram, curry leaves and asafoetida.

3. When the mustard starts to splutter and the bengal gram is golden brown, remove from flame and add to the ground coconut mix.

4. Mix it well and serve.

Note: If you don't want a lot of crispness, avoid adding the chick peas and reduce quantity of bengal gram.

Other than chutney or pickle is there anything else that goes well with lemon rice? Should I try something else next time?

Thursday, 7 March 2013

How to Make Mysore Rasam With Brinjal


*** I am following Meenakshi Ammal's recipes, however I'm using shortcuts like the cooker, etc. and adding some of my own twist to the recipes. What you see here are my recipes inspired by M. Ammal's and in no way is Ms. Ammal responsible for its outcome should you choose to try it. Though she was responsible for the brilliant outcome of my dish, so, a big thank you Ms. Ammal for writing Samaithu Par.***

A couple of weeks back I made Mysore Rasam with Drumsticks and we enjoyed it. Che especially since he likes the flavour of drumsticks but not the vegetable. So when Vidya commented and told me to try out the brinjal version, I thought why not. After all, brinjal is another vegetable Che doesn't like :D

Mysore Rasam with Brinjal

Ingredients -
(Serves 4 cups)
1/2 cup red gram dhal
1 lime size ball of tamarind
2 cups water
2 small size brinjals
1/8 teaspoon of asafoetida
salt to taste
curry leaves
coriander leaves
1/2 teaspoon coriander seeds
2 teaspoon bengal gram dhal
6 red chillies pinched into two
6-8 raw peppers (green or dried)
1 teaspoon mustard
1 teaspoon ghee
3 teaspoon gingelly oil

Method -
1. Wash and cut brinjals into medium size cubes.

2. Wash and cook dal in a cooker with a little salt and turmeric until very soft.

3. Soak tamarind in warm water. Strain out pulp.

4. Heat 2 tsp oil and fry brinjals until golden brown. Remove from oil and keep aside.

5. In the remaining oil fry coriander seeds, bengal gram and 4 red chillies. Remove from oil and powder fine along with pepper.

6. Drain water from dhal and keep aside. Mash the dhal.

7. In a vessel add the tamarind pulp to two cups of water. Add asafoetida, salt to taste, the fried brinjals and a few bruised curry leaves. Cover and allow the mixture to boil.

8. Add mashed dhal to boiling tamarind water and stir well. Cover and boil for a few minutes before adding the dhal water. Add more water if needed to make it 4 cups quantity. 

9. Bring to a boil again and after a couple of minutes remove from fire.

10. Add the chilli and coriander powder and mix well.

11. Heat 1 tsp of oil and 1 tsp of ghee and fry mustard, 2 red chillies and curry leaves.

12. Pour over the rasam.

13. Finally garnish with chopped coriander leaves.

What other veggies have you tried for rasams? Any recommendations?

Tuesday, 26 February 2013

How To Make Buttermilk Sambar


*** I am following Meenakshi Ammal's recipes, however I'm using shortcuts like the cooker, etc. and adding some of my own twist to the recipes. What you see here are my recipes inspired by M. Ammal's and in no way is Ms. Ammal responsible for its outcome should you choose to try it. Though she was responsible for the brilliant outcome of my dish, so, a big thank you Ms. Ammal for writing Samaithu Par.***

On Pongal day I was looking to make a nice simple traditional meal that wasn't the usual sambar rice. Flipping pages I noticed the recipe of buttermilk sambar. As I glanced though it I thought it would be a more kuzhambu, but it wasn't. It did seem like a sambar recipe, so decided to try it. It surprised me by tasting really good; when you think buttermilk sambar, you don't think it'd be this tasty. (Sorry about the picture, I forgot to click before eating and that's what the leftovers looked like :D )

Buttermilk Sambar

Ingredients -
(Serves 4)
3/4th cup red gram dhal
1 cup sour buttermilk
1/2 teaspoon mustard
1/4 teaspoon fenugreek seeds
4-6 red chillies pinched into two (based in spiciness)
4 green chillies
1/2 inch piece ginger or 1/2 teaspoon ginger paste
few curry leaves
some coriander leaves
gingelly oil 3 teaspoons
salt to taste
3 medium size potatoes for seasonings*

*seasonings - I used potato but you could also use drumstick, brinjal, lady's finger, chow chow and ash-gourds. Most other vegetables don't go well with curd/buttermilk. Make sure to either boil or fry the vegetables before you add them to the sambar.

Method -

1. Boil the dhal in a cooker with a pinch of salt until it's very soft. You can boil the potatoes along with the dhal.

2. Heat oil in a vessel. When the oil is hot add mustard, fenugreek, red chillies and green chillies. Add ginger and curry leaves when mustard starts to splutter and green chillies are scalded.

3. Sort the curry leaves quickly and add the buttermilk.

4. Add the seasonings. If you are using potatoes though, don't add them just yet.

5. Drain the water from the dhal and add it to the buttermilk in the vessel. Mash the cooked dhal partially.

6. When the buttermilk boils add the dhal mash and salt to taste, mix well and let it come to a boil again while occasionally stirring.

7. Let it boil for a couple of moments, then remove from fire.

8. Chop some coriander and keep aside for garnishing.

9. Peel boiled potatoes and chop into medium sized cubes. You can also cut them smaller or larger based on what you prefer.

10. Deep fry the potatoes until they are golden brown. Crisp on the outside and soft on the inside. Keep aside.

11. Garnish the buttermilk sambar with potatoes and coriander before serving.

Have you made buttermilk sambar before? Have a different recipe or any tips for me?

Tuesday, 19 February 2013

How to Make Sambar Without Sambar Powder


*** I am following Meenakshi Ammal's recipes, however I'm using shortcuts like the cooker, etc. and adding some of my own twist to the recipes. What you see here are my recipes inspired by M. Ammal's and in no way is Ms. Ammal responsible for its outcome should you choose to try it. Though she was responsible for the brilliant outcome of my dish, so, a big thank you Ms. Ammal for writing Samaithu Par.***

I wanted to make sambar but the only sambar powders I have at home are the ready made ones we don't like much and I didn't have the time to make a new batch of powder so I was looking for a sambar that didn't need sambhar powder.

Seasoned Sambar

Ingredients -
(Serves 4)
3/4 cup red gram dhal
1 lime size ball of tamarind
2 carrots sliced*
5 french beans chopped in inch size pieces
6 red chillies pinched into two
1/4 teaspoon fenugeek seeds
1/2 teaspoon mustard
one pinch asafoetida
2 green chillies
1/4 teaspoon turmeric powder
2 teaspoons gingelly oil
curry leaves
coriander leaves
salt to taste

*Seasonings - Instead of carrot and beans, you can also use - brinjal, drumstick, lady's finger, chow chow, pumpkin, runner beans, etc.

Method -

1. Cook the dhal in a cooker with a pinch of salt, turmeric powder and 1 teaspoon gingelly oil until soft.

2. Soak tamarind in warm water. Strain the pulp.

3. Heat the rest of the oil in a vessel and fry the mustard, fenugreek, curry leaves and red chillies until brown but not burned.

4. Add the asafoetida and green chillies. (If you like green chilly spice make a slit in the chillies.) Add a few bruised curry leaves.

5. Add carrots and beans and sort before adding tamarind water to the fried spices.

6. Add salt.

7. When vegetables are cooked, mash the dhal and add it into the vessel. Mix well and bring to a boil.

8. Boil for a few minutes and remove from fire.

9. Garnish with coriander leaves and serve.

Do you know any other recipes to make sambar without sambar powder?

Tuesday, 12 February 2013

How To Make Drumstick Mysore Rasam


*** I am following Meenakshi Ammal's recipes, however I'm using shortcuts like the cooker, etc. and adding some of my own twist to the recipes. What you see here are my recipes inspired by M. Ammal's and in no way is Ms. Ammal responsible for its outcome should you choose to try it. Though she was responsible for the brilliant outcome of my dish, so, a big thank you Ms. Ammal for writing Samaithu Par.***

I big drawback I stumbled upon was that Part one of Samaithu Par does not have a recipe to make rasam powder. This recipe is in book two and most recipes in book one for rasam need rasam powder. So I had to find a rasam that did not need rasam powder. Hence Mysore Rasam and to add the twist - drumstick.

Drumstick Mysore Rasam

Ingredients -
(Serves 4 cups)
1/2 cup red gram dhal
1 lime size ball of tamarind
2 cups water
2-3 drumsticks
a pinch of asafoetida
salt to taste
curry leaves
coriander leaves
1/2 teaspoon coriander seeds
2 teaspoon bengal gram dhal
8 red chillies pinched into two
5-6 raw peppers (green or dried)
1 teaspoon mustard
1 teaspoon ghee
2 teaspoon gingelly oil

Method -

1. Wash and cut drumsticks into long pieces and cook along with the dhal and a pinch of salt in a cooker until soft.

2. Soak tamarind in warm water. Strain out pulp.

3. Heat the oil and fry coriander seeds, bengal gram and 6 red chillies. Remove from oil and powder fine along with pepper.

4. Remove drumsticks from dhal and scrape out the pulp from the boiled drumsticks and keep aside.

5. Drain water from dhal and keep aside. Mash the dhal.

6. In a vessel add the tamarind pulp to two cups of water. Add asafoetida, salt to taste, the drumstick pulp and a few bruised curry leaves. Allow the mixture to boil.

7. Add mashed dhal to boiling tamarind water and stir well. When it boils again add the dhal water.

8. Bring to a boil again and after a couple of minutes remove from fire.

9. Add the chilli and coriander powder and mix well.

10. To the oil remaining from the first time, add ghee and fry mustard, 2 red chillies and curry leaves.

11. Pour over the rasam to garnish along with chopped coriander leaves.

Note: I hadn't mashed the drumstick and also had used just one. You need more than one to have a prominent flavour and mashing the pulp will help.

What is the major difference between the usual rasam and the Mysore rasam? I don't see a big difference... Do you know?

Friday, 4 January 2013

Samaithu Par and How to Make Venn Pongal and Coconut Thuvaiyal

Samaithu Par


I come from a family of good cooks, a place where almost all the men cook a mean meal and the women are just oh-la-la! Growing up in good food meant I never saw a need to learn to cook, I just ate :D And since cooking runs in the family, when I did need to cook, I didn't burn stuff often. :P

Now 32 years later I'm learning to cook!

As a Diwali gift this year I got a copy of Samaithu Par by S. Meenakshi Ammal. This is the quintessential South Indian cooking guide that has been passed from mother to daughter at marriage for the last few decades. Its even available in 5 languages.

My south indian cooking being limited and average I thought this would be a good challenge for 2013. I am going to learn south indian cooking from Master M. Ammal. (Like that Julia and Julia thing remember, only Freya and Ammal don't sound as good)

The book's great but it has two short-comings. It doesn't have photos so you don't know what your dish will look like and the layout is confusing if you're not well-versed in south indian cuisine. The latter I overcame thanks to a friend who patiently talked me through the book. But I still need to make visuals of the dishes listed.

Though this year I'm going to try and cook the dishes M. Ammal has listed in book one and take pictures of them. I'll post photos and my version of the recipe here on the blog as I go along :) It's fully Samaithu Par - Cook and See...

*** I am following Meenakshi Ammal's recipes, however I'm using shortcuts like the cooker, etc. and adding some of my own twist to the recipes. What you see here are my recipes inspired by M. Ammal's and in no way is Ms. Ammal responsible for its outcome should you choose to try it. Though she was responsible for the brilliant outcome of my dish, so, a big thank you Ms. Ammal for writing Samaithu Par.***

Pongal and Coconut Thuvaiyal


Venn or White Pongal
(Pongal is that soulful dish what can make any day and tummy better. Not spicy, but warm, soft and soothing, it's easy and perfect for those days when you're not up to it.)

Ingredients -
1 cup rice
1/2 cup green gram dal (the yellow kind called masoor)
1 teaspoon black pepper
1/2 teaspoon fresh or preserved green pepper
4 cups water
Salt to taste
4 teaspoon of ghee
1 1/2 teaspoon of oil
10-12 curry leaves
1 1/2 teaspoon cumin seeds
1 inch piece of ginger

Method -
1. Check the dal for stones and dirt, then fry it lightly in a pan.

2. Clean the rice and add the fried dal to it before washing them together.

3. Cook the rice and dal in a cooker with 3 cups of water, salt and peppers. I usually cook it on full flame until the first whistle and then on sim for 10 minutes.

4. Bruise the cumin seeds with a mortar and pestle and finely chop the ginger.

5. Heat the oil in a vessel and add the cumin, ginger and curry leaves.

6. When the cumin starts to splutter add a portion of the cooked rice and dal mix. Add the ghee and mix well. Add a bit of water if needed. Keep mixing and adding the rice mix and water until it all mixes and has a slightly sticky texture. Make sure not to over mash it.

7. Serve hot.

Coconut Thuvaiyal
(This is a sour textured chutney that I think would go well with something that needs a hit of flavour and feel)

Ingredients -
150 gms fresh coconut
6 dried red chillies
1 lime size ball of tamarind
Salt to taste
1 teaspoon mustard seeds
3 teaspoons black gram dal
1/4 or less teaspoon asafoetida (hing)
5-6 curry leaves
3 teaspoons oil

Method -
1. Soak the tamarind in a little warm water, then mash and strain to get smooth pulp.

2. Fry 4 chillies and remove from oil.

3. Grind the chillies to small flakes before adding coconut and tamarind pulp. Grind the coconut to a fine paste. Add water if necessary. When done empty into a bowl.

4. Heat the oil again and add mustard seeds, black gram dal, remaining chillies broken in two and curry leaves. When the mustard splutters add asafoetida.

5. Pour the oil and spices into the bowl and mix with the coconut.

6. Mix and add salt to taste.

If you try out these recipes do let me know how it turned out.

Wednesday, 3 October 2012

My First Ever Sponge Cake - A Coffee Sponge Cake: Recipe


A few days ago I tried to make my first sponge cake. It turned out fairly well though I’d want it spongier so I guess I’ll keep experimenting until I get it right.

Here’s the steps I followed for my Coffee Sponge Cake

Ingredients –

175gms – flour
125gms – sugar
125gms – butter
2 eggs
1 tbsp – instant coffee power
½ tsp – vanilla essence

Method -

  1. Heat the oven to 180deg. C.

  2. In a bowl mix the butter and sugar. I used granulated sugar (a baker told me that works better than icing sugar). Beat it intermittently until the sugar melts. This may take a little time so you could leave the mix standing and beat it every 5 minutes until its done.

  3. Add the eggs to the mix and beat it again until it all mixes well and looks a little fluffy.

  4. Add the flour into the mix in portions while continuing to beat.

  5. Add the coffee powder and vanilla essence.

  6. Beat the mix until is has a drop consistency. To check the consistency either use the beater or a spoon. The batter should fall off the spoon in blobs, it should not drip and neither should it stick to the spoon. If it drips add more flour. If it sticks add a couple of teaspoons of milk.

  7. Prep your baking tin. To do this rub the inside of the tin with butter and then add flour and shake the tin until you have a fine layer of flour sticking to the butter. Shake off any excess flour.

  8. Pour or ladle the cake mix into the mold and gentle tap the mold to level the batter.

  9. Bake the cake for 25 minutes at 180deg. C.

  10. Check if the cake is cooked by inserting a knife into the cake. If it comes out clean the cake is cooked, else bake for a few more minutes. Baking time changes from place to place so it takes a few attempts to find the perfect time needed.

  11. Remove the cake mold and let it rest for 10 minutes.

  12. Invert the cake mold and gently tap to remove the cake and let it cool for another 10-15 minutes.

  13. Now eat and enjoy! :)


I did a few other experiments –

  1. After lining the mold with butter and flour I added a bit of sugar at the bottom before adding the cake mix so I got a cake with sugar on top.

  2. After removing the cake from the mold I added more sugar at the top and put it back in the oven. This gave the cake a caramalised top and a slightly crunchy crust with a soft center.

  3. I wanted a chocolate center so I poured half the batter in the mold, then placed a strip of dark chocolate in the center keeping away from the walls of the mold and added the remaining batter on top. Note though that when checking to see if the cake is cooked you need to insert the knife slightly off center so you don’t come away with a knife covered in chocolate.


Here are three recipes I referred to while making my cake –

Really Easy Sponge Cake - allrecipes.co.in
Sponge cake - BBC Food Recipes
Simple Sponge - BBC GoodFood

Thursday, 20 September 2012

Making Modaks For The First Time


Since it was Ganesh Chaturti yesterday I decided to try making some modaks. Ganesha is my favourite god and his favourite food is modak! This was the first time I’d made them though I’ve eaten them quite a lot at friend’s houses. :D

Here is the recipe I followed. (Special thanks to my friend Harishri Babuji for explaining it to me.)

Ingredients –

1 cup rice flour
¾ cup water
½ teaspoon salt
2 teaspoons of ghee
1 cup of fresh grated coconut
1 cup of grated jaggery
2 cloves of elaichi

Method –

  1. Heat the water with a teaspoon of ghee until it boils.

  2. Add the flour while mixing. The mixture will be lumpy but that’s ok.

  3. Let the mixture to cool a bit. While its still warm knead the mixture to get a smooth consistency.

  4. Wrap the dough in a damp cloth and keep aside.

  5. In another pan heat a teaspoon of ghee.

  6. Add the coconut and jaggery and stir lightly.

  7. Remove the mixture from heat before the jaggery melts.

  8. Remove and powder the seeds of the elaichi. Add to the mixture.

  9. Coat your hands with a little ghee and make balls of the dough.

  10. Take a ball of dough and shape it into a little cup.

  11. Put about a teaspoon of the coconut mixture into the cup.

  12. Press the edges of the cup together and bring it together to make a pointed tip. While folding you can create a design.

  13. Take care to make sure the dough does not split and spill the mixture.

  14. Place the little bundles in a steamer and steam for 5-6 minutes.

  15. Serve :)


These proportions should make about 8-10 modaks.

Mistakes I think I made and corrections I’d like to make next time.

  1. My dough was splitting a lot. One reason may be that I left the kneaded dough to cool to long. I think it would be more pliable when a bit warm. Also rice flour absorbs water like crazy so I think I’d like to add 1 cup of water next time rather than ¾.

  2. My flour cups were quite thick. I need to make them much thinner next time.

  3. My jaggery melted before I could do anything about it. I think it would have worked better if I had added the coconut first and sorted it. Put off the heat and then added the jaggery. The mixture being googy didn’t help when I was folding the cups.


I’d always though making modaks was difficult but this was easy. Takes a bit of time to make the cups and fold them though. I look forward to making them again soon. Will keep you posted on my learnings here.

If you have any tips to help me make my modaks better next time, please let me know in the comments :)

Sunday, 22 August 2010

Week 3: Akki Roti or Rice Roti

This week had me thinking quite a bit about what to cook… Finally my tummy made the choice :)

Akki Roti (Rice Roti)


Ingredients:

3 cups rice flour
1 cup cooked rice (optional)
1 big onion
2 medium size chillies
Fist full of coriander leaves
½ tsp Jeera (cumin) powder
Salt to taste
Ghee
Textured cloth napkin or handtowel

Preparation:

Finely chop onion, chilles and coriander.

Mix  the rice flour and rice in a bowl. Add chopped onions, chilles and coriander. Add jeera powder and salt to taste.

Knead the mixture into dough. Add water slowly as not much water will be required. The dough should be soft but not sticky.

Adding rice is a trick I learnt from Mom. Cooked rice (especially when a bit old) acts as a gluing agent and gives the roti its own texture too.

Wet the textured cloth napkin or handtowel so that it is moist but not dripping. Place a ball of the dough on this and pat flat to required thickness with your fingers. Keep dipping your hands in water to make sure the dough doesn’t stick to your fingers.

Heat a girdle (tava) and add a few drops of ghee before gently but firmly flipping the roti (with cloth) onto the tava. Now slowly lift away the cloth and cover the girdle to cook the roti on a slow flame. Flip roti, add some ghee and cook until both sides are golden.

Older generations pat the roti out right on the pan. I find the cloth method easier and it lets me thin out the roti quite a bit too.

The roti’s take a while to cook so you may want to use two pans. Be careful to not over-fry as then they become very crisp.

Serve hot with pudi, chutney, pickle or curry. Serves two hungry people :D

Sunday, 15 August 2010

Spicy Meaty Cheesy Cutlets

Chenthil’s been away this week in Alleppey leading a Photography On The Move workshop and of course that meant a lot of quick simple food (simple = roti, curd & pickle) for me. Since he’s returning tomorrow I thought I’d try something special for him. Try it and tell what you think of it… or just ask him (@ChenthilMohan) :D


Spicy Meaty Cheesy Cutlets

Ingredients –

5 potatoes
3 onions
2 green chillies
4 garlic cloves
1 inch ginger piece
1 tsp jeera powder (cumin)
½ tsp red chilly powder
½ tsp ginger garlic paste (optional)
1 cup powdered poha (beaten rice)
Salt to taste
½ cup boiled mince meat
Cheese slices
Wheat flour

Preparation -

Boil potatoes with a little salt. Peel and mash after cooling.

Grind onions, garlic, green chillies and ginger to fine paste.

Mix mashed potatoes and onion paste in a bowl with jeera power, red chilly powder, ginger garlic paste and mince meat. Once mixed well add the powdered poha to thicken the mixture. Add salt to taste.

Make four pieces out of each cheese slice and make big lemon size balls of the potato mixture.

Flatten each ball; add the cheese slice and fold sides in until cheese is covered uniformly. Flip the cutlet in flour and keep aside. Repeat for all balls. :D

Shallow fry the cutlets in oil until golden brown.

Serve hot with mint sauce or tomato sauce.

Update: - Potatoes don't always work well for holding in molten cheese. Using eggs or maida as a wrap will keep the cutlet well together. Beat eggs and flip the cutlets in it before frying or make a thin maida batter and dip cutlets in this before frying.

Sunday, 8 August 2010

I hate cooking! and a Sweet & Spicy Carrot Soup with Bread Sticks

I hate cooking! Well, not really… I hate cooking regular food. My favourite dish in the world is Dal and Chaval (rice) but I hate cooking it and its varieties every day. I haven’t cooked in a while and have started to miss the kitchen now, so I decided to give the hubby a break and cook once a week (magnanimous isn’t it :D)

The challenge is to enjoy cooking in the true sense – feel the textures, savour the aromas and get all excited to see the outcome. To hold me down to my resolution, I’m posting it up here. As we go along I will share my experience and recipes too! :)

I’ve had a bad sensitive tooth this whole week and haven’t eaten much. I just kept getting tired of chewing in only one side of the mouth. I really did get tired! So this week’s recipe is…

Sweet & Spicy Carrot Soup with Bread Sticks


Ingredients –

5 Peeled Carrots
1 Tomato
10 Almonds
1 dry red chilly (or chilly flakes would do)
3 cloves Garlic
½ tsp. Ginger Garlic paste
1 tbsp. Butter
1 pinch Jeera
1 Maggie Magic soup cube
Pepper (corns and powder)
1 cup Milk
1 pinch Rock salt
Salt to taste
1 Bread loaf

Preparation –

Boil carrots and tomato in three cups of water with ginger garlic paste and a little salt. (two whistles should do it)

After the veggies cool, remove skin of tomato and blend the carrots & tomato to a puree. (save stock)

Grind almonds to a fine powder, add the chilly and grind again. Finally add garlic and grind again, it should form a paste. Do not add water while grinding.

Heat the butter (adding a few drops of oil before you add the butter will prevent it from burning), put in a pinch of jeera and a few pepper corns. Add the almond paste to the butter and sort well.

When you get the aroma of roasted almonds with a twinge of chilly, add the carrot-tomato puree.

Mix it well and sort for a bit. Add the remaining stock and the soup cube. Let the mixture cook for 5 minutes. The colour will lighten a bit.

Add pepper powder to taste with a pinch of rock salt. Add 1 cup milk and salt to taste. Let the soup simmer for 10 minutes.

Serve hot and garnish with celery or coriander.

For bread sticks – cut strips from bread slices. (I find it easier and cleaner to cut the slices before roasting.) Roast the slices in an open pan on slow flame. This takes a while but gives a great crispy texture.